
 My desk is an absolute wreck right now. Crazy work deadlines, regular ole boring life stuff - just the usual. So I was trying to tidy up a bit and came across this note my daughter left for me on my desk ages ago. I love it so much.
P.S. - the yellow dots are just bled-thru marker from a previous drawing she did
P.P.S. - The transformer is mine. It's my fiddle-with-me-while-you-nervously-giggle-while-on-a-conference-call toy.
P.P.P.S. - Yeah, it's a crappy iPhone pic. I should have at least Hipped it up, eh? Sorry. Gotta make it to the grocery store before I go get the kids from school.
P.P.P.P.S. My P.S.es are now longer than my post
Tuesday, April 20, 2010
Cheering on the crafty goodness
Monday, April 12, 2010
Archive-Along Part 6: Good Ole Tear Sheets

We're winding down our instructional portion of the Archive-Along, and I'll give more information on the next steps that include you at the end of this post. Today, I'm talking tear sheets. While the impetus of this series was focusing on how we needed to archive digital work, it also makes sense to focus on printed work as well. If you've had any work in print (projects, articles, profiles, etc.) it's important to keep good records of those, and it can't hurt to also convert them to digital files to have extra backups.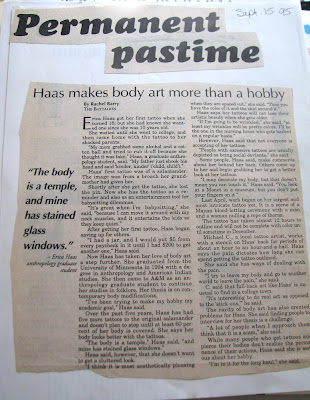 When I worked for my college newspaper, we had newsroom assistants who would go through the newspaper every day and create tear sheets for all the reporters. They would cut out every article, tape each to a piece of paper, write the date on the paper and would then file them in a folder for each reporter in our physical archives. (we were juuuuuust getting started online. It was the 90s, kids!) It was a handy way to have all our work in one place and made it easy to find and pull our best pieces when we wanted to create a portfolio.
While most of my work these days is in digital format, I have had some print work that needs to be curated, so to speak. It's important to keep track of the work and have it properly labeled and easily accessible so it can be shared when needed.
 I'm including these glimpses of my college work for pure laughter purposes here, folks.
 If you are creating tear sheets of your work, you can do one of a few things.
File Folders - go truly old school and do a literal cut-and-paste of printed materials on a piece of 8X11.5 paper, include the date and possibly the masthead of the publication and put them in a file folder. Be sure to use archival supplies. Looking back through my college newspaper archives, I realize that attention to archival quality was ... er ... lacking. And though my college days feel like they just flew by last week, a quick glance at the dates on the pages reminds me it's been a good 15 years since I wrote these gems.
Loose Leaf Notebook - similar to a file folder, but use sheet protectors instead. Creates a handy, portable portfolio.
 Digitize 'em! - It is also helpful to scan in and save your print work in digital format. From here, you can back it up or archive it in any of the ways that have been discussed during the Archive-Along. It's nice to be able to point people to my printed work with a simple link, and after the Archive-Along experience, I'm finally just about caught up in having all my print work stored in digital format.
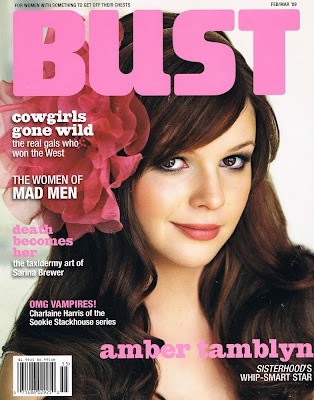
When you are digitizing them, you also have the option to create a bit of a collage to showcase the work and publication. For example, the embroidered ad I did for Tito's vodka that was in BUST magazine and the projects I stitched for Jenny Hart's Embroidered Effects book last year could look, instead, like this:

 For newer publications, you may find that they keep digital archives already. If they do, fantastic, but you'll also want to save a PDF version just in case they ever remove their archives or switch to a new system where you may have trouble accessing your work (it's happened to me!)
Now that we're winding down the instruction part of the Archive-Along, we're ready for you to chime in with your progress. You've hopefully been ... well ... Archiving right Along with us, but if you are still in the process of backing up and creating portfolios, take a couple of days to finish up what you can and share your progress with us. As you know, Diane is podcasting the heck out of the Crafty Chica Cruise right now, so we have some downtime when you can get your work together. Share it in the comments with links or in our Flickr group. We'll have a round up of reader-submitted tips, projects and successes next week! Thanks so much for joining us, and let us know if you have any questions or tips you'd like to offer!
Thursday, April 8, 2010
Archive-Along Part 5: Backing up your Tweets
 Yesterday's Archive-Along post from Diane on Blog Books was fantastic. I especially loved the magazine option for printing copies of your best blog posts. I had no idea that was available, and it's got me thinking that I will likely combine that option with my tweets discussed here today to create a special publication of my space shuttle launch adventures ....
Today's Archive-Along installment is about backing up your tweets. At first glance, the idea of backing up handfuls of 140 character bits of conversation may seem silly, but if you think again (and if you've been using Twitter effectively) you'll realize how much valuable information is contained in your tweets.
 There are two kinds of tweets that making backing up your Twitter feed important: the ones in which you share useful information/links/pictures and the ones which capture in-the-moment expressions of special occasions. Twitter quickly became my go-to social network, and I found it was the easiest, quickest way to disperse information or commentary on something I was doing. Because of that, some of my richest bits of memories are floating out there in Twitterland. This is especially true for my space shuttle launch experience.
 I also find myself using Twitter constantly to share interesting things I find on the internet. I'm an internet junkie, and the only thing I love more than finding cool stuff on the internet is sharing it with friends. But where do all these found gems disappear to if I shoot them out to Twitter and then do nothing to follow up?
Here are some options for backing up your tweets:
A backup service
There are several services out there for backing up your tweets. They range from free to small monthly or annual fees. Mashable has a nice roundup here. Choosing a service will be mostly personal preference and what your budget allows. Be sure to look for things like easy searching, option to add tags to your tweets, backup of favorites/mentions/DMs, etc.
I favorite things in Twitter like crazy. I'll often zip through Twitter while I'm waiting somewhere (at the doctor's office, in a line, after-school pick up for the kids) and if I see something that looks interesting but I don't have time to read it right away, I'll favorite the tweet so I can go back and check it out later. My favorites become (for the most part) a rich bookmark resource. I want those suckers to be saved!
Another tip: Use your hashtags! If you are tweeting from an event or on a special subject, pick a hashtag, stick to it and use it every.single.time. I realized that I wasn't doing this during my STS-130 launch experience, and if I'd come up with my own special tag, finding my tweets later would have been muuuuuuch easier. Learn from my mistake!
Analog backup:
In addition to backing up your tweets online, it can be fun to find other ways of using your tweets in your work. Think back to Diane's post about archiving your blog in zine format. If you were creating a zine based around a particular event or special subject on which you'd also been tweeting, pulling those tweets into the zine can be a great way to sprinkle personal commentary throughout the publication. And now that I've read about the glossy printed magazine DIY option from Diane's post yesterday, I really want to try this with my MAKE pieces and tweets from the launch. Again, I'll use my space shuttle launch experience to demonstrate. After the launch, I put together an iPhoto book that chronicled my adventures before, during and after the launch. One thing I really wanted to include, but ended up not having time to, was screen shots of some of my tweets throughout that experience. Honestly, I ran out of time. I wanted the book done in time to take down to Houston for the debrief event so I could have it signed by the crew. I didn't have time to search my tweets (that weren't backed up at the time - argh!) and pull screen shots.
 For those of you who use Twitter regularly and effectively, your tweets become an important extension of your blog conversations. Backing them up needs to be a priority.
Wednesday, April 7, 2010
Archive-Along Part 4: Blog Books
 Slight change of plan here. I was supposed to be posting about backing up your Tweets today, but during my research of tweet backup options, hit a few potholes in the road. Never fear, though, Diane has stepped in with her awesome post on turning blog posts into books using various online printing services. She gives great tips and nice overviews of three different services. Check out her post, and then be ready for my Tweet backup post tomorrow and a post on tearsheets on Friday.
Are you archiving along with us? Be sure to leave comments with your experiences so we can blog about you and check out the main Archive-Along post on Diane's site. See you back here tomorrow!
Monday, April 5, 2010
Archive-Along Part 3: Backing up Your Blog
 Today's Archive Along posts from Diane are like gold. She's covering how to back up your blog, whether you host your blog through a free service like Blogger or Wordpress or if you host it yourself. She also covers how to back up the images you use in your blog. Her advice and instruction are - as usual - impeccable and incredibly valuable. Go read it right now, and then back up your blog today. I love her idea, too, of setting a recurring event in her Google calendar to remind her to back up her blog every week. Handy!
Next on the Archive-Along agenda: I'll be covering backing up your tweets (Twitter) on Wednesday.
Don't forget, you can see the full Archive-Along index over on Diane's site, and be sure to Archive-Along with us and share your tips and results in the comments so we can share them in our big wrap up once the Archive-Along is complete!
Thursday, April 1, 2010
Archive-Along Part 2: Using Google Profiles to Archive and Promote Your Best Work
 Yesterday, Diane took you on a bit of an analog adventure for archiving your best online work. I'm still daydreaming about whipping up little blog collection zines for my friends and family members. It's just a brilliant idea!
Now it's my turn, and today we're going digital.
I knew about Google Profiles, but hadn't looked into them much before a few months ago. I was trying to do some background research on a friend for a story, and when I asked her if she had any articles or information online that I could browse, she sent me one handy link: her Google Profile. There, she had linked several articles about her work and awards, as well as her various online presences (Twitter, Facebook, etc.)
I instantly realized the value of such a page. Not only is it a great way to easily organize links to your best work, but it's a great way of having one place to which you can direct folks when you have a robust online presence. Think of it as less formal than a resume, but more formal than a Facebook profile.
I'm almost tempted to change my email signature to a link to my Google Profile page. Right now, my signature is several lines long, and I still don't have links to everything I'd like folks to check out. If I just had a link to my Google Profile, they could go there and see and use as much or as little as they want. Tempting ...
Another great thing about Google Profiles is that you can include a batch of photos that will rotate when people visit. This is especially valuable for folks who are making things and want to display pictures of them.
How to set up your Google Profile:
You'll need a Google/Gmail account and will need to be logged in when you visit the main Google Profiles page. There, you'll see a button that says, "View My Profile." Click that button to be taken to your profile page. If you haven't added any extra information to your profile before, you'll see a message that tells you you need to add more information before your profile can be featured in Google Searches. Click "Add more information" and let's get started!
From here, it's pretty straightforward. Just fill in the blanks as you see fit. (You don't have to enter text in all the boxes if you don't want to) When you enter cities in the "where I grew up, where I live now, places I've lived" those spots will show up on a small Google Map under "My Places" on your profile.
Under "Short Bio," you can write your personal elevator pitch. I'd recommend keeping it short, sweet and to the point, but not so stuffy that it comes off like a cover letter. You can include links and some formatting in your bio. Use with care!
Now the really good stuff: Links and Photos
Adding links is pretty straightforward as well. I recommend first adding all the places you can be found online: your blog, your Etsy shop, Twitter, Facebook, etc. Follow that up with links to your best work. Find some of your best writing, projects, etc. and link those babies up. Next, if you've been written about online (profiles, interviews) link to those. If you decide you want to change the order of your list of links, just use the little up and down arrows to move the links around. Be thoughtful about your grouping and keep like items together, and describe the links well so folks will be able to determine if they want to click or not.
Adding Pictures:
Click the "Photos" tab at the top of the page to add pictures to your profile. You will be able to pull items from Picasa, Flickr, or an album to which you can link. If you are pulling items from Flickr (not sure about Picasa) you can pull from a specific set. I ended up setting up a specific set called "Google Profile" in my Flickr stream so I could put in pictures from all areas of my work (embroidery, writing, space geekery).
Maintaining Your Profile
Once you've put in the effort to get your profile page all nice an organized, you just need to remember to update it every once in a while. When you publish a great project, get featured on another website, or upload a favorite picture to Flickr, just take a couple of minutes to add the link to the profile and the picture to your set and you'll be all ... set. From there, any time you need to send a succinct set of your best work to someone, you'll have just the thing!
Subscribe to:
Posts
(
Atom
)